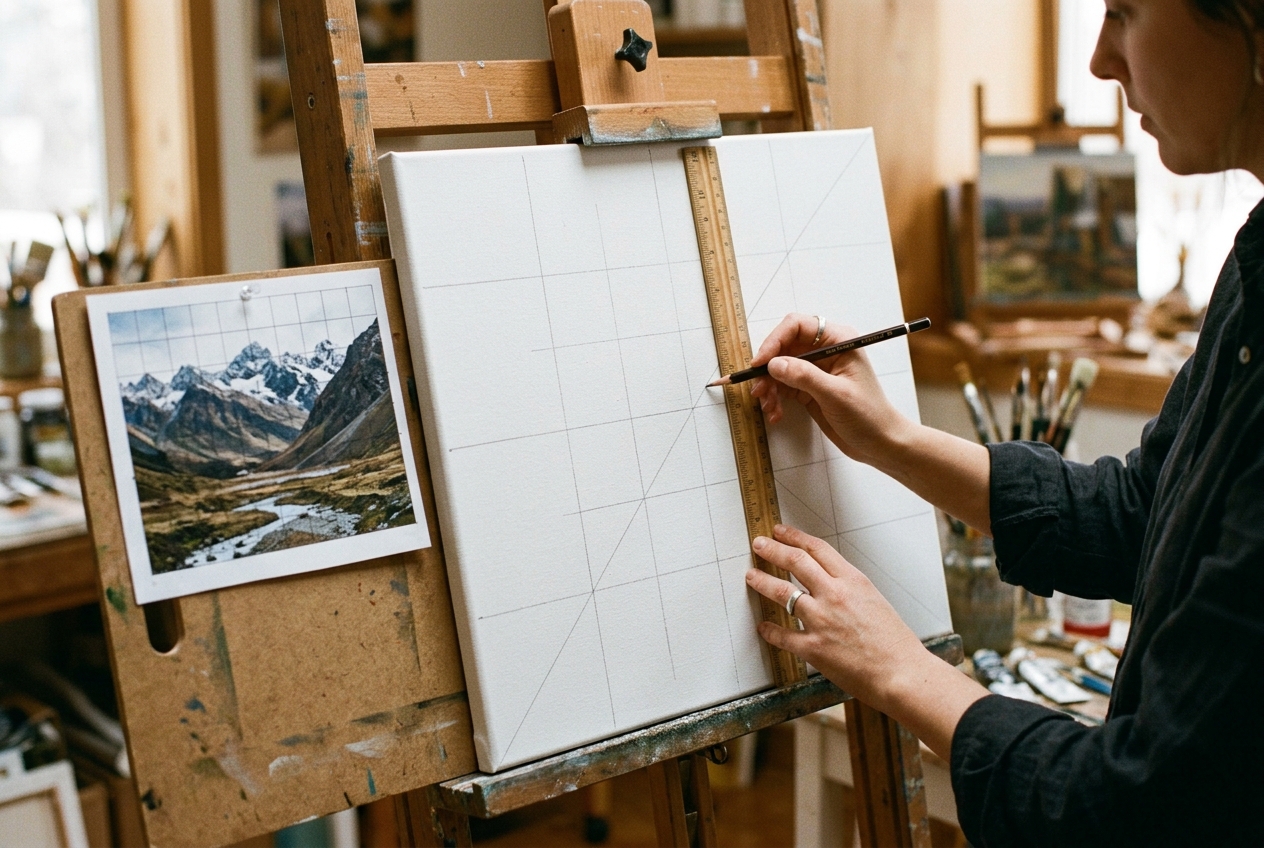
Have you ever spent hours carefully sketching a painting from a reference photo onto a large canvas, only to step back and realize that your subject looks squashed, the eyes are misaligned, or the horizon has drifted crookedly uphill?
Drawing proportions accurately by eye is one of the hardest skills in art. Human vision is naturally subjective: our brains unconsciously exaggerate focal elements (like faces, eyes, and hands) while compressing background scale.
For centuries, classical artists from Albrecht Dürer and Leonardo da Vinci to Chuck Close solved this problem with a beautifully simple mathematical tool: the Grid Method.
The grid method enables you to enlarge or reduce any reference image onto any drawing surface with surgical precision. Rather than trying to draw a complicated scene all at once, you divide the reference into a matrix of small, manageable squares, drawing one bite-sized box at a time.
In this comprehensive studio guide, you will learn the exact mathematics behind scaling ratios, how to select the right grid density, how to use classical diagonal sight-lines, and how to apply the method cleanly without leaving dark pencil grooves on your canvas.
1. How the Grid Method Works: The Cognitive Science of Drawing
Why is drawing a 1-inch box so much easier than drawing a 24-inch painting?
When you attempt to sketch a complete human portrait or sweeping mountain landscape freehand, your brain’s left hemisphere activates symbolic thinking: it thinks “I am drawing an eye” or “I am drawing a mountain”, and it forces preconceived symbols onto the paper.
The grid method acts as a cognitive hack that short-circuits this symbolic trap:
1. It breaks a complex silhouette into simple abstract lines (curved arcs, intersections, negative spaces).
2. Instead of thinking “I have to draw this horse’s leg”, you think “This dark line enters box D-4 at one-third of the left edge and exits at half of the bottom edge”.
3. By focusing purely on geometric coordinates, your observational accuracy skyrockets, ensuring that relative proportions, angles, and distances remain 100% faithful to the original reference.
+---+---+---+---+
| A1| B1| C1| D1|   Reference: 4" x 3" (1" squares)
+---+---+---+---+
| A2| B2| C2| D2|   ───► Scale Factor: 4x ───►  Canvas: 16" x 12" (4" squares)
+---+---+---+---+
| A3| B3| C3| D3|   Each cell maps 1-to-1 with identical geometric accuracy.
+---+---+---+---+
2. Aspect Ratio Matching: The Most Common Grid Mistake
Before you draw a single line, there is a fundamental mathematical rule you must verify: does your reference photo match the aspect ratio of your canvas?
If your photo has a 3:2 ratio (standard DSLR snapshot, e.g., 4″ × 6″) and your canvas has an 8:10 ratio (e.g., 16″ × 20″), they are geometrically incompatible!
If you force a 3:2 image onto an 8:10 canvas with an equal number of grid squares, your grid squares on the canvas will become rectangles instead of squares, resulting in an unnaturally stretched or squished painting.
Standard Ratio Compatibility Table
| Reference Aspect Ratio | Common Photo Dimensions | Compatible Canvas Sizes | Crop Required for Canvas |
|---|---|---|---|
| 1:1 (Square) | 4″ × 4″, 8″ × 8″, 12″ × 12″ | 12″ × 12″, 20″ × 20″, 30″ × 30″ | None |
| 3:2 (Classic 35mm) | 4″ × 6″, 8″ × 12″, 12″ × 18″ | 12″ × 18″, 16″ × 24″, 24″ × 36″ | None |
| 4:3 (Standard Phone / Tablet) | 6″ × 8″, 9″ × 12″, 18″ × 24″ | 9″ × 12″, 12″ × 16″, 18″ × 24″ | None |
| 5:4 (Atelier Standard) | 4″ × 5″, 8″ × 10″, 16″ × 20″ | 8″ × 10″, 11″ × 14″ (approx), 16″ × 20″ | Slight crop |
### How to Fix Mismatched Ratios
You have two options when your canvas and photo do not match:
1. **Crop the Photo First:** Crop your photo to match your canvas ratio (e.g., crop a 4×6 photo down to 4×5 so it scales seamlessly to 16×20).
2. **Leave Letterbox Margins:** Draw your grid on the canvas to match the photo’s true aspect ratio, leaving a small, clean border on the top or sides for a painted frame or decorative mat.
🛠️ Skip the Math with Pintado: Calculating grid cell dimensions and cropping borders manually with a tape measure can be tedious. Pintado’s Free Grid Method Calculator automatically detects your photo’s aspect ratio, overlays custom square or ratio grids, and calculates the exact measurements for any canvas size in centimeters or inches.
3. Choosing the Right Grid Density: How Many Boxes Do You Need?
A common question among beginners is: “How big should each grid square be?”
The ideal grid density depends entirely on the complexity of your subject matter:
[ Low Density: 4x4 or 5x5 Grid ] ──► Best for broad landscapes, calm still lifes, and quick block-ins
[ Medium Density: 8x10 or 10x12 ] ──► Standard for animal portraits, florals, and architectural scenes
[ High Density: 16x20 or finer ] ──► Essential for detailed human portraits, hands, and foreshortening
The Rule of Landmarks
Your grid should be dense enough so that no single square contains more than two key structural landmarks.
For example, in a human portrait:
– If a single grid square contains an entire eye, eyebrow, temple, and tear duct, your grid is too loose. You will still have to guess internal spacing.
– If the upper eyelid passes through Box C-4 and the iris center sits squarely in Box C-5, your grid density is perfect.
4. The Master Technique: Adding “Sight Diagonals”
Renaissance draughtsmen didn’t just draw horizontal and vertical lines; they subdivided their grid with diagonal sight lines (the harmonic armature).
+-------+-------+
|     /|     /|   By connecting corners diagonally, you create:
|    / |    / |   1. An exact center point (X) without measuring.
|   /  |   /  |   2. 45-degree angle guides for tilting heads or tree branches.
|   X   |   X   |   3. 4 smaller internal triangular zones to verify slope angles.
|  /   |  /   |
| /    | /    |
|/     |/     |
+-------+-------+
Why Diagonals Prevent Slope Errors
One of the most frequent errors in drawing is misjudging the angle of a tilt—such as a tilted head, a jawline, or a perspective road. When you have diagonal lines crossing through your grid cells, you can immediately observe:
– “Does the jawline cross above or below the 45° diagonal line?”
– “Does the mountain ridge parallel the diagonal or cross it perpendicularly?”
In Pintado’s grid tool, you can toggle on “Atelier Sight Diagonals” with one click to overlay these diagonal vectors directly over your reference image.
5. Step-by-Step Tutorial: Enlarging a 4″×6″ Reference to an 18″×24″ Canvas
Let’s walk through a real-world atelier enlargement session from start to finish.
Materials Checklist:
– Reference photograph printed or on a digital tablet
– Canvas or watercolor block
– Long metal or wooden ruler (at least 24 inches)
– Hard graphite pencil (2H, 3H, or 4H) or vine charcoal
– Drafting tape
– Kneaded eraser
Step 1: Number and Letter Your Reference Grid
Generate your grid using Pintado’s calculator. Ensure you have Letters across the top (A, B, C…) and Numbers down the side (1, 2, 3…). Having alphanumeric coordinates prevents the dizzying mistake of sketching into Box F-7 when you meant to be in Box G-7!
Step 2: Measure and Mark Canvas Edges
Using your ruler, make small, sharp pencil ticks along all four outer edges of your canvas:
– If scaling a 6-box wide grid onto a 24-inch canvas: $24 div 6 = 4 text{ inches per square}$.
– Mark at 4″, 8″, 12″, 16″, and 20″ along the top edge, then repeat along the bottom edge.
– Mark the vertical increments along both the left and right edges.
Step 3: Draw Grid Lines with Feather-Light Pressure
Connect the ticks using your long ruler.
⚠️ Critical Rule: Draw your grid lines with the lightest possible touch using a 3H pencil or light vine charcoal. Never press into the canvas weave! If you score grooves into the gesso, those indents will catch paint later and remain visible in the finished artwork.
Step 4: Map the Negative Space Intersections
Do not start by drawing the object. Instead, start by marking the points where the subject’s silhouette intersects the grid boundaries:
1. Look at Box B-2. Notice where the shoulder line enters the top border (e.g., halfway across). Make a tiny tick on your canvas.
2. Notice where it exits Box B-2 (e.g., one-quarter down the right border). Make another tick.
3. Draw the curve connecting those two ticks.
4. Move to Box B-3 and continue.
Step 5: Erase Grid Lines Before Applying Color
Once your contour outline is locked in place, you must erase the grid lines:
– If working in oil or acrylic: Roll a kneaded eraser over the grid lines to fade them until they are barely visible. If using charcoal, flick them off with a soft chamois cloth.
– If working in watercolor: Erase the grid completely, leaving only the transferred contours. Watercolor washes are transparent and will seal pencil lines under dry pigment layers forever if not removed beforehand!
6. Pro-Tips for Painless Grid Drawing
| Tip | Why It Matters |
|---|---|
| Label Coordinates in the Margin | Writing “A, B, C” and “1, 2, 3” in the outer canvas border saves you from accidental box displacement. |
| Mask Adjacent Cells with Paper | If a complex area (like lace or hair) overwhelms you, cover neighboring squares with two pieces of scrap paper to focus purely on one cell. |
| Step Back Every 15 Minutes | Stand 6 to 8 feet back from your canvas regularly. Your eye will instantly detect any shape that feels out of rhythm with the rest of the composition. |
| Use Colored Pencils for Grids | If working on an oil underpainting, draw your grid with a light Raw Sienna watercolor pencil. The lines will dissolve naturally into your initial turpentine/mineral spirit wash. |
—
Frequently Asked Questions (FAQ)
Is using the grid method considered “cheating”?
No. The grid method has been an established studio practice for over 500 years. Great masters like Vermeer, Dürer, and Degas used mechanical transfer devices, camera obscuras, and proportional grids. The grid is simply a drafting tool for scaling; the artistry, brushwork, edge control, and emotional depth of the painting still come entirely from your hand.
How do I grid onto a dark, toned canvas (Imprimatura)?
If your canvas has been pre-toned with burnt umber or dark gray, regular graphite pencil will be invisible. Instead, use a white pastel pencil, a sharpened stick of vine charcoal, or a General’s white chalk pencil. These mark smoothly and dust off with a dry towel once your painting is blocked in.
Can I use the grid method on a digital drawing tablet?
Absolutely! Simply export your gridded image from Pintado as a PNG, place it on the bottom layer of your digital art app (like Procreate, Photoshop, or Clip Studio), lock it, and lower the layer opacity to 25% while sketching on a layer above.
Conclusion: Build Your Foundations with Confidence
The greatest painting in the world cannot rescue a flawed underlying drawing. By adopting the grid method for your preparatory stage, you eliminate proportion anxiety, protect your canvas from heavy eraser scrubbing, and ensure that your final artwork captures the exact likeness and grandeur of your reference.
Ready to prep your next canvas? Head over to Pintado’s Free Grid Method Calculator, customize your grid density and sight diagonals, and start your next studio masterpiece with 100% confidence.